Git integration
Data pipelines are composed of many assets, including pipeline scripts, configuration files, dependency descriptors (such as for Conda or Docker), documentation, etc. When you manage complex data pipelines as Git repositories, all assets can be versioned and deployed with a specific tag, release, or commit ID. Version control and containerization are crucial to enable reproducible pipeline executions, and provide the ability to continuously test and validate pipelines as the code evolves over time.
Seqera products have built-in support for Git and several Git-hosting platforms. This page covers Git integration for both Seqera Platform and Seqera AI.
Seqera Platform
Seqera Platform enables launching pipelines directly from Git repositories. Pipelines can be pulled remotely from both public and private Git providers, including the most popular platforms: GitHub, GitLab, and BitBucket.
Public repositories
Launch a public Nextflow pipeline by entering its Git repository URL in the Pipeline to launch field.
When you specify the Revision number, the list of available revisions are automatically pulled using the Git provider's API. By default, the default branch (usually main or master) will be used.
nf-core is a great resource for public Nextflow pipelines.
The GitHub API imposes rate limits on API requests. You can increase your rate limit by adding GitHub credentials to your workspace as shown below.
Private repositories
To access private Nextflow pipelines, add the credentials for your private Git hosting provider to Seqera.
Credentials are encrypted with the AES-256 cypher before secure storage and are never exposed in an unencrypted way by any Seqera API.
Multiple credential filtering
When you have multiple stored credentials, Seqera selects the most relevant credential for your repository in the following order:
- Seqera evaluates all the stored credentials available to the current workspace.
- Credentials are filtered by Git provider (GitHub, GitLab, Bitbucket, etc.)
- Seqera selects the credential with a Repository base URL most similar to the target repository.
- If no Repository base URL values are specified in the workspace credentials, the most long-lived credential is selected.
Credential filtering example
Workspace A contains four credentials:
Credential A
- Type: GitHub
- Repository base URL:
Credential B
- Type: GitHub
- Repository base URL:
https://github.com/
Credential C
- Type: GitHub
- Repository base URL:
https://github.com/pipeline-repo
Credential D
- Type: GitLab
- Repository base URL:
https://gitlab.com/repo-a
If you launch a pipeline with a Nextflow workflow in the https://github.com/pipeline-repo, Seqera will use Credential C.
For the application to select the most appropriate credential for your repository, we recommend that you:
- Specify the Repository base URL values as completely as possible for each Git credential used in the workspace.
- Favor the use of service account type credentials where possible (such as GitLab group access tokens).
- Avoid storing multiple user-based tokens with similar permissions.
Seqera AI
Seqera AI integrates with your pipeline GitHub repositories to provide intelligent assistance with pipeline development and modification. To fully utilize the power of Seqera AI, it needs access to your pipeline codebase to analyze, suggest changes, and even create pull requests on your behalf.
Set up GitHub access
To enable Seqera AI to interact with your pipeline GitHub repositories:
-
Generate a personal access token
- Navigate to GitHub Personal Access Tokens
- Create a new token with the following permissions:
- Pull Requests: Read & Write
- Contents: Read & Write
- Your token value will be displayed only once. Copy it before navigating away from the tokens page.
-
Add the token to Seqera AI
- Open Seqera AI.
- In the bottom-left user menu, select Add token.
- Enter your personal access token in the field provided, then select Set token.
Capabilities
With proper GitHub access configured, Seqera AI can:
- Access and analyze your pipeline codebase
- Create feature branches for proposed changes
- Generate pull requests for your review
- Suggest improvements based on your existing code patterns
Seqera AI respects your repository's branch protection rules and will create pull requests for review rather than directly modifying protected branches.
Seqera Platform Git provider credentials
The following sections detail how to configure credentials for specific Git providers in Seqera. These credentials enable access to private repositories for pipeline execution.
Azure DevOps repositories
You can authenticate to Azure DevOps repositories using a personal access token (PAT).
Once you have created and copied your access token, create a new credential in Seqera using these steps:
Create Azure DevOps credentials
- From an organization workspace: Select Credentials > Add Credentials. From your personal workspace: Go to the user menu and select Your credentials > Add credentials.
- Enter a Name for the new credentials.
- Select Azure DevOps as the Provider.
- Enter your Username and Access token.
- (Recommended) Enter the Repository base URL for which the credentials should be applied. This option is used to apply the provided credentials to a specific repository, e.g.,
https://dev.azure.com/<your organization>/<your project>.
GitHub
Use an access token to connect Seqera Platform to a private GitHub repository. Personal (classic) or fine-grained access tokens can be used.
A user's personal access token (classic) can access every repository that the user has access to. GitHub recommends using fine-grained personal access tokens (currently in beta) instead, which you can restrict to specific repositories. Fine-grained personal access tokens also enable you to specify granular permissions instead of broad scopes.
For personal (classic) tokens, you must grant access to the private repository by selecting the main repo scope when the token is created. See Creating a personal access token (classic) for instructions to create your personal access token (classic).
For fine-grained tokens, the repository's organization must opt in to the use of fine-grained tokens. Tokens can be restricted by resource owner (organization), repository access, and permissions. See Creating a fine-grained personal access token for instructions to create your fine-grained access token.
After you've created and copied your access token, create a new credential in Seqera:
Create GitHub credentials
- From an organization workspace: Select Credentials > Add Credentials. From your personal workspace: Go to the user menu and select Your credentials > Add credentials.
- Enter a Name for the new credentials.
- Select GitHub as the Provider.
- Enter your Username and Access token.
- (Recommended) Enter the Repository base URL for which the credentials should be applied. This option is used to apply the provided credentials to a specific repository, e.g.,
https://github.com/seqeralabs.
GitHub App
Authenticate Seqera Platform to GitHub using GitHub Apps, the GitHub-recommended way to integrate with the GitHub API. They act on their own behalf rather than impersonating a user, support fine-grained permissions that target specific repositories, and use short-lived installation tokens that don't belong to a single account.
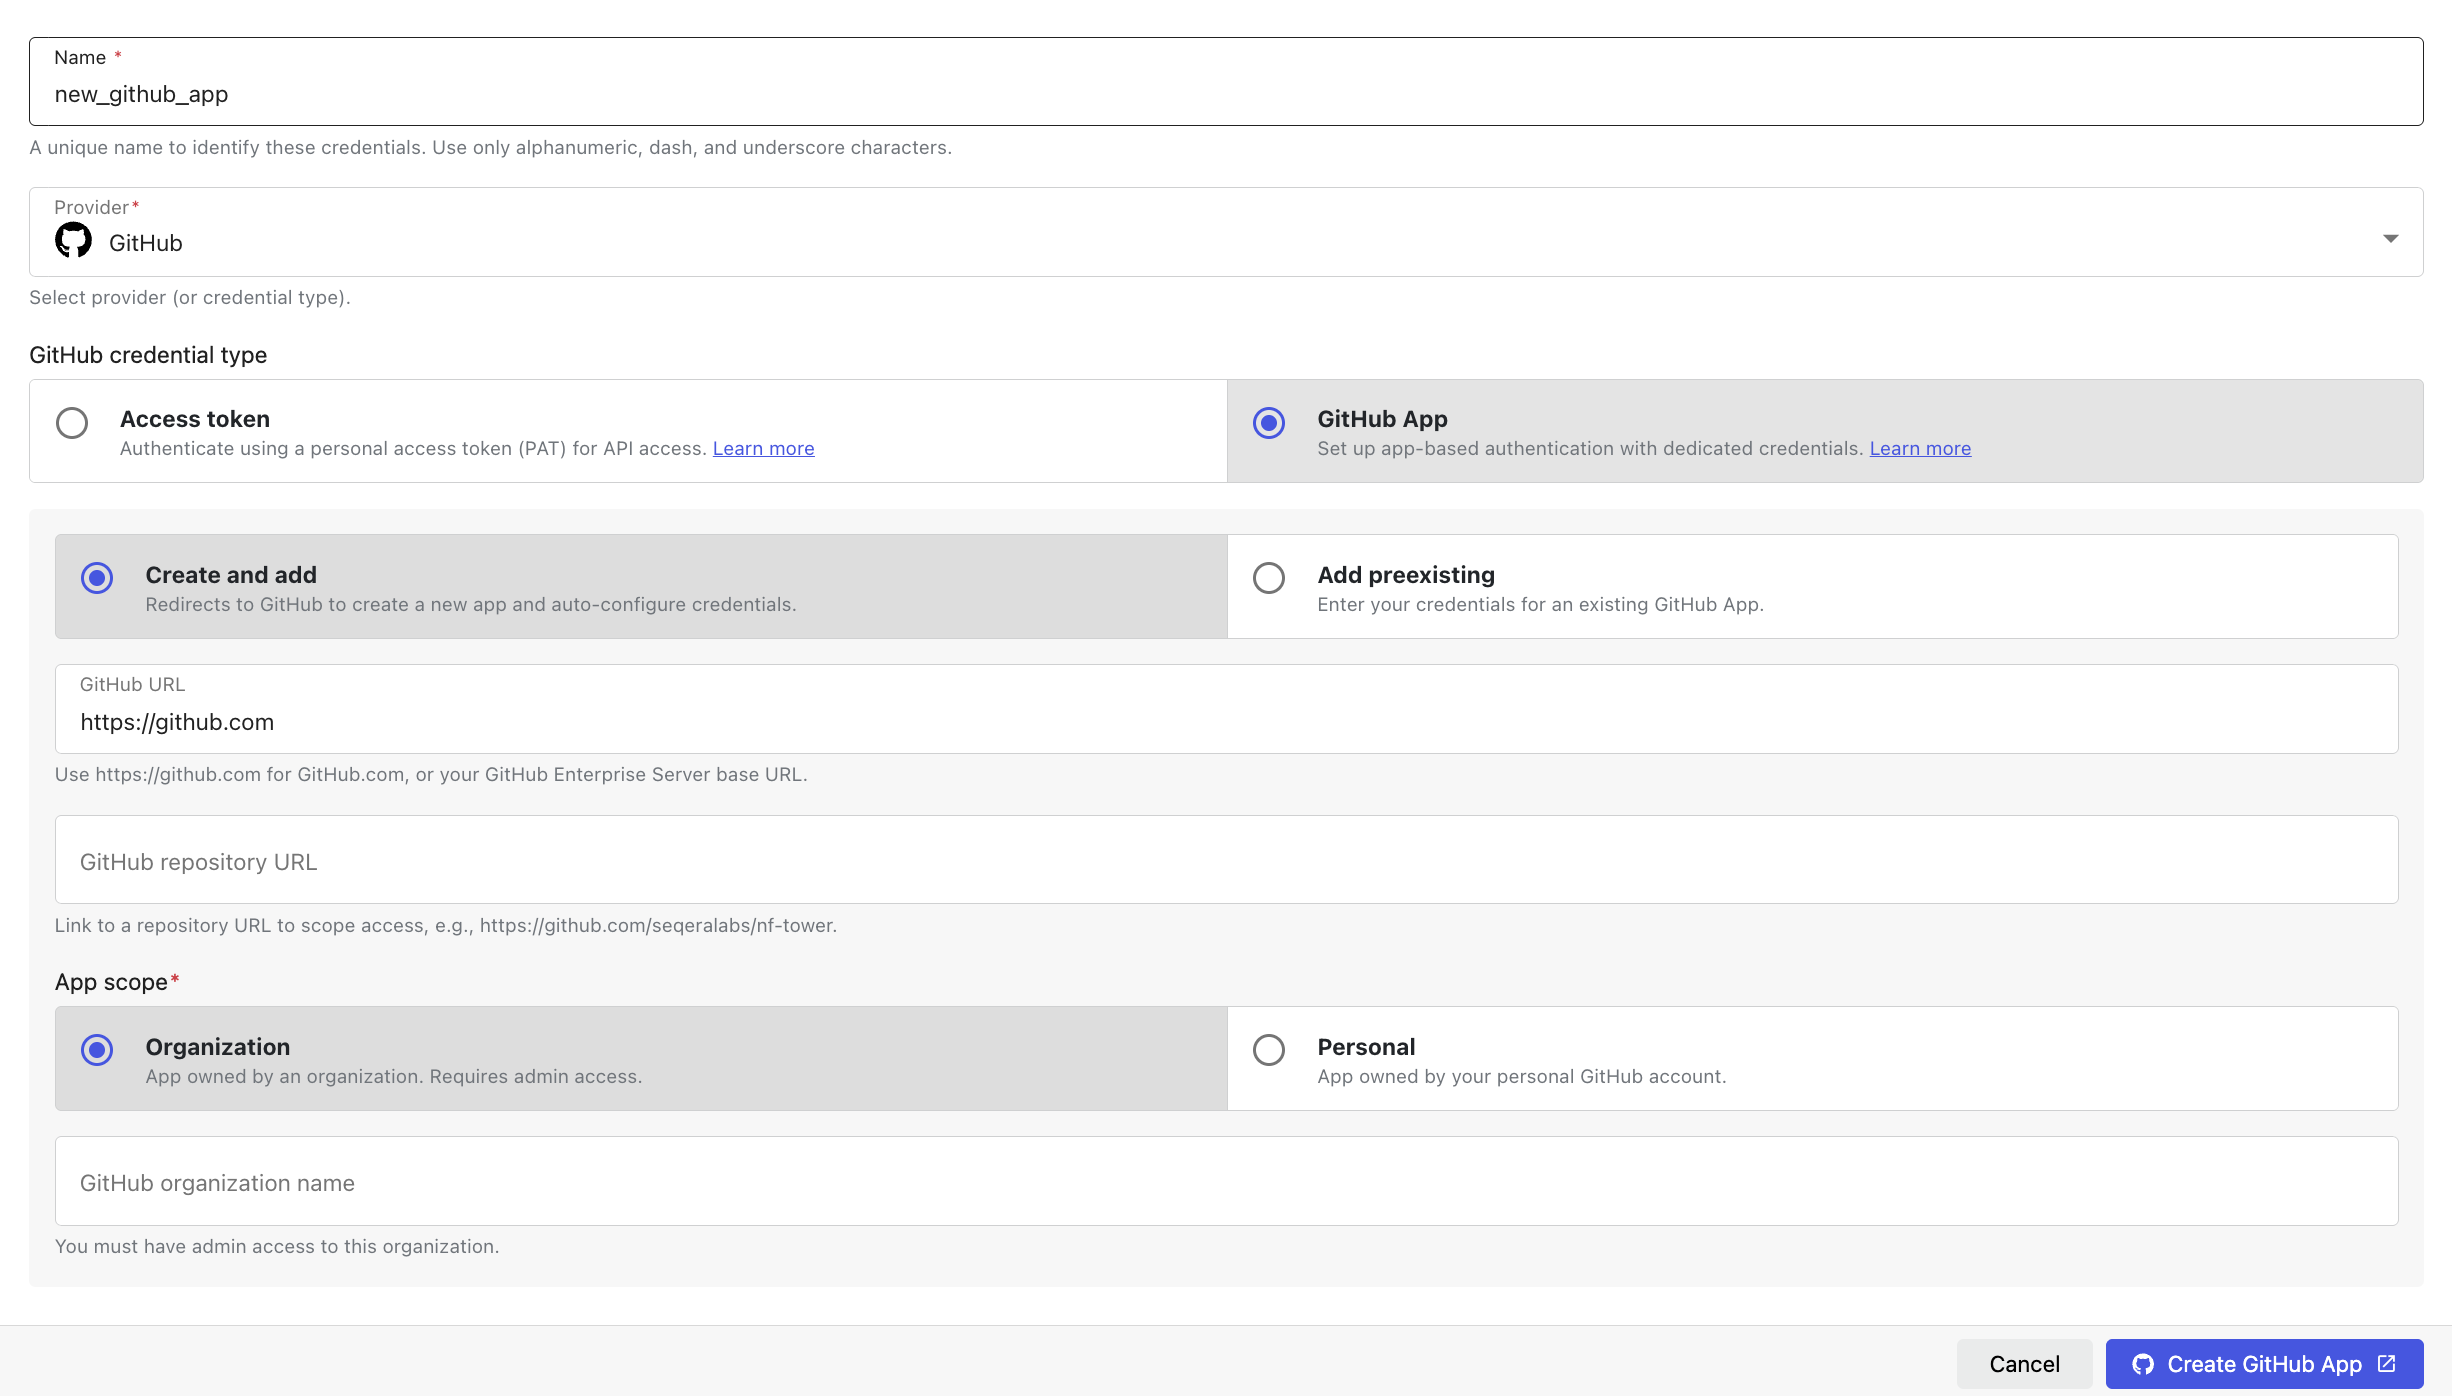
When you select GitHub as the Provider, the credentials form shows a GitHub credential type selector with two tabs:
- Access token: Authenticate using a personal access token (PAT) for API access. See the legacy flow in the GitHub section above.
- GitHub App: Set up app-based authentication with dedicated credentials. Select this tab to access a second selector with two flows:
- Create and add: Use the GitHub App manifest flow to create a new app on GitHub directly from Seqera. Seqera generates a pre-filled manifest, redirects you to GitHub for approval, then automatically retrieves and stores the resulting App ID, private key, client secret, and webhook secret.
- Add preexisting: Register an app you have already created on GitHub by entering its App ID, installation ID, private key, and other security keys manually.
For new integrations, use the manifest flow (Create and add). It removes the manual copy-paste of secrets, ensures the app is created with the minimum required permissions (contents: read, metadata: read), and avoids configuration errors. Use Add preexisting only if the app already exists or must be created outside of Seqera.
Create a new GitHub App from Seqera
To create and install a GitHub App from Seqera with the manifest flow:
-
Go to the credentials page:
- Organization workspace: Select Credentials > Add Credentials.
- Personal workspace: Select your user menu, then select Your credentials > Add credentials.
-
Enter a Name for the new credentials, for example,
my-github-app.noteUnderscores in the credential name are replaced with spaces in the resulting GitHub App name (e.g.,
Seqera Platform - my github app). -
Select GitHub as the Provider, set the GitHub credential type to GitHub App, then select Create and add.
-
Enter the GitHub URL:
- For GitHub.com, leave the default value (
https://github.com). - For a GitHub Enterprise Server instance, enter the base URL of your instance (e.g.,
https://github.example.com). HTTPS is required. Private or loopback addresses are rejected.
- For GitHub.com, leave the default value (
-
(Optional) Enter the GitHub repository URL to scope access to a single repository, for example,
https://github.com/seqeralabs/nf-tower. Leave this field empty to create credentials that are not bound to a specific repository. -
Select the App scope:
- Organization: App owned by an organization (requires admin access). Enter the GitHub organization name (case-sensitive). You must be an owner of the target organization to create an app on its behalf.
- Personal: App owned by your personal GitHub account. The GitHub organization name field is hidden.
-
Select Create app on GitHub. Seqera redirects you to GitHub:
- For personal scope:
https://github.com/settings/apps/new - For organization scope:
https://github.com/organizations/<your-org>/settings/apps/new - For GitHub Enterprise Server, the equivalent path on your instance.
The manifest is pre-filled with the app name, callback URL, webhook URL, and the required permissions (
contents: read,metadata: read).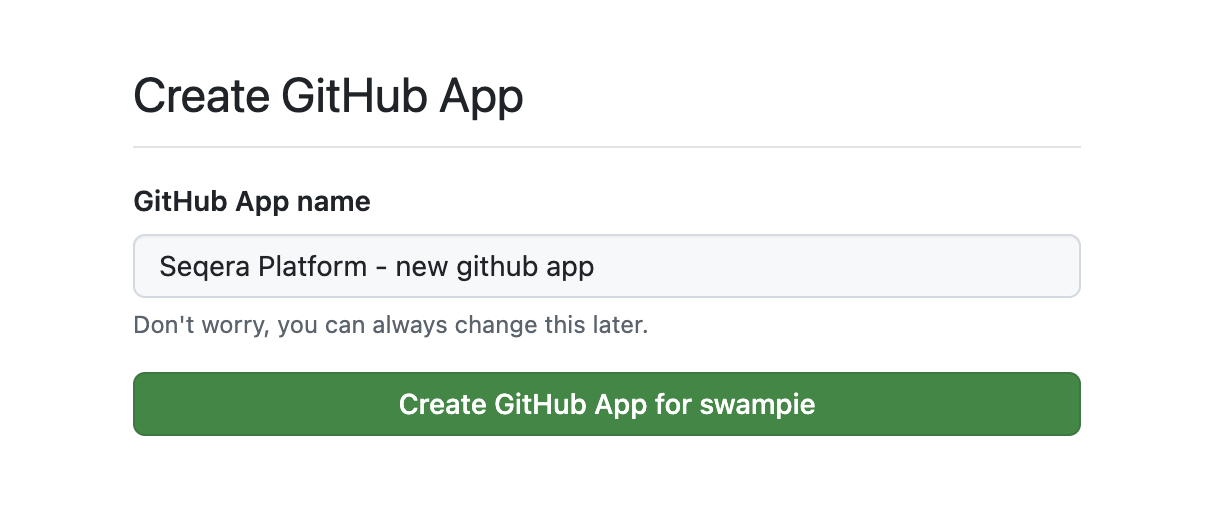
- For personal scope:
-
On GitHub, review the requested permissions and select Create GitHub App. GitHub redirects you back to Seqera, which exchanges the temporary code for the app credentials and stores them in your workspace or personal credentials.
-
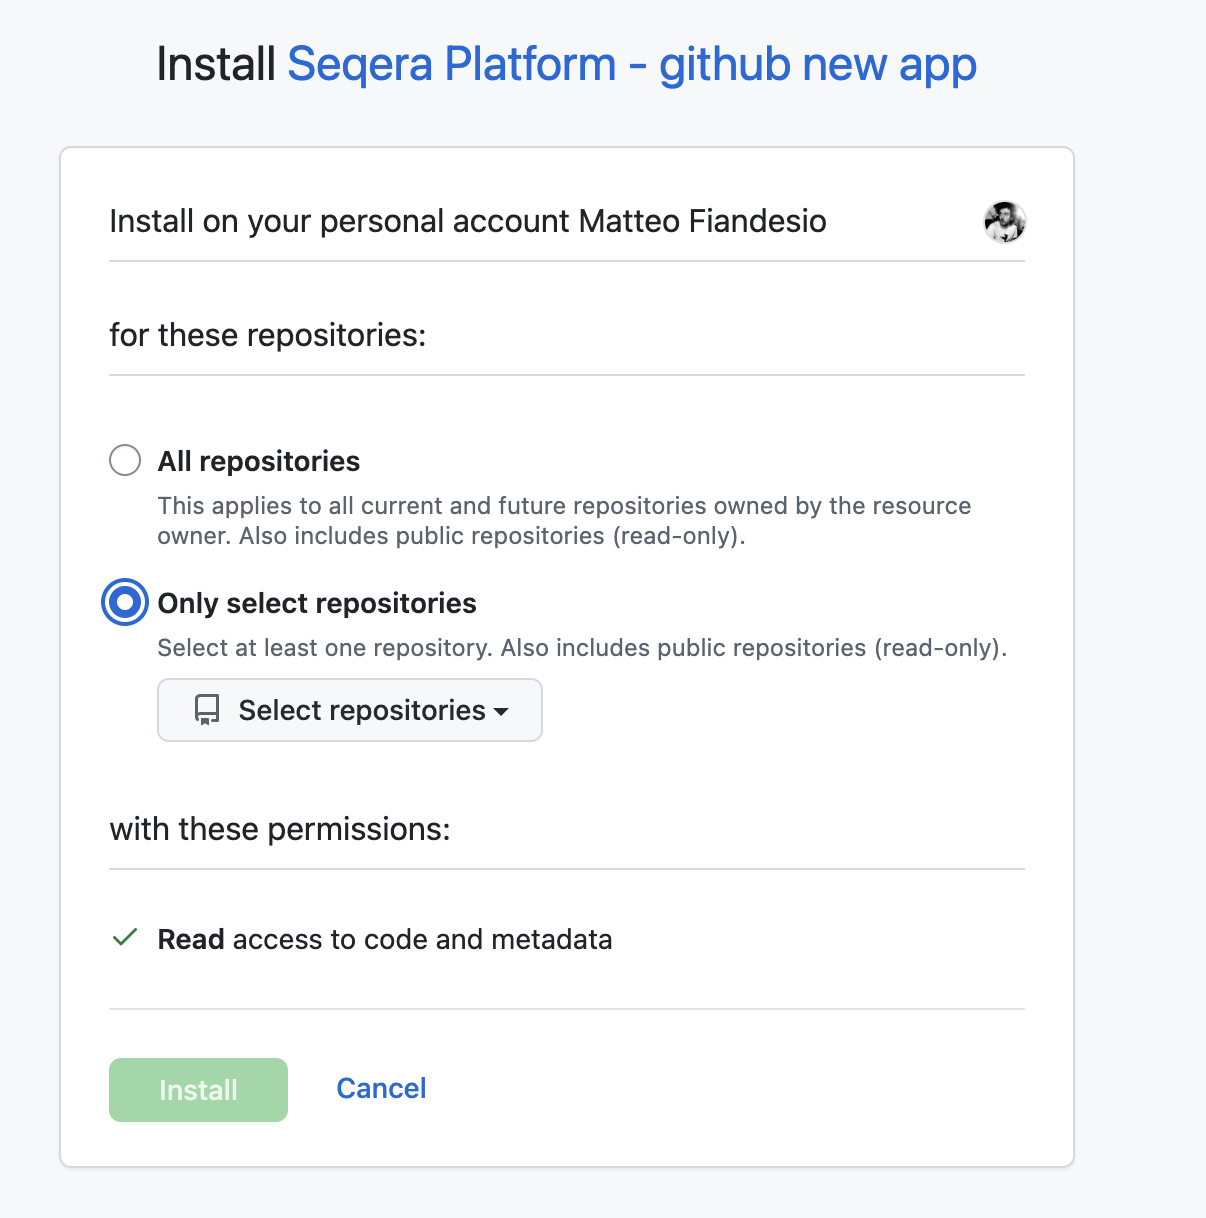
After the redirect, install the app on the repositories you want Seqera to access:
- Open the new app on GitHub: Settings > Developer settings > GitHub Apps > [your app] > Install App.
- For an organization-owned app, select the organization.
- For a personal app, select your user account.
- Choose Only select repositories and add the specific repositories Seqera should access, or select All repositories to grant access to all current and future repositories.
- Select Install to complete installation.
The new credential appears in your Credentials list with the GitHub App icon. Credentials created from your workspace credentials page are scoped to that workspace; credentials created from your personal credentials page are scoped to your user and are not visible to any workspace.
If you cancel the manifest flow on GitHub or close the browser tab before approving the app, no credentials are created on Seqera. The temporary state that protects the redirect against CSRF expires after 10 minutes and cannot be reused. To try again, restart the flow from the credentials form.
Add an existing GitHub App
To register an existing GitHub App in Seqera:
- Set the GitHub credential type to GitHub App and select Add preexisting
- Enter the GitHub URL, App scope, and, if required, the GitHub repository URL described above.
- Enter the app's security keys. To find these values, go to Settings > Developer settings > GitHub Apps > [your app] on GitHub:
- App ID
- Installation ID
- App slug
- Private key
- Client secret
- Webhook secret
- Select Add to save the credentials.
Handling duplicate credentials
Seqera enforces uniqueness of GitHub App credentials by Repository URL within the same workspace or user context. If a GitHub App credential already exists for a given repository URL, any attempt to create another (through either the manifest flow or the existing-app flow) fails with a duplicate error. No new credential is stored.
To resolve a duplicate:
- Reuse the existing credential: In most cases the existing credential already grants Seqera the access it needs. Open it from the Credentials list to confirm the association between the installed app and the repository.
- Delete the obsolete credential first: If the existing credential is stale (e.g., the app has been uninstalled or the private key was rotated outside of Seqera), delete it from the Credentials list and then re-run the creation flow.
- Use a different repository URL or leave the field empty: If you need a second credential covering a broader scope, omit the Repository URL or use a different one. Seqera's credential filtering then selects the most specific match at launch time.
GitLab
GitLab supports Personal, Group, and Project access tokens for authentication. Your access token must have the api, read_api, and read_repository scopes to work with Seqera. For all three token types, use the token value in both the Password and Access token fields in the Seqera credential creation form.
After you have created and copied your access token, create a new credential in Seqera with these steps:
Create GitLab credentials
- From an organization workspace: Select Credentials > Add Credentials. From your personal workspace: Go to the user menu and select Your credentials > Add credentials.
- Enter a Name for the new credentials.
- Select GitLab as the Provider.
- Enter your Username. For Group and Project access tokens, the username can be any non-empty value.
- Enter your token value in both the Password and Access token fields.
- Enter the Repository base URL (recommended). This option is used to apply the credentials to a specific repository, e.g.
https://gitlab.com/seqeralabs.
Gitea
To connect to a private Gitea repository, use your Gitea user credentials to create a new credential in Seqera with these steps:
Create Gitea credentials
- From an organization workspace, go to the Credentials tab and select Add Credentials. From your personal workspace, select Your credentials from the user menu, then select Add credentials.
- Enter a Name for the new credentials.
- Select Gitea as the Provider.
- Enter your Username.
- Enter your Password.
- Enter your Repository base URL (required).
Bitbucket
To connect to a private BitBucket repository, see API tokens to learn how to create a BitBucket API token (the API token must have at least read:repository:bitbucket scope). Then, create a new credential in Seqera with these steps:
API tokens are tied to users. This differs from access tokens, which are tied to a specific resource. While Seqera supports API tokens, access tokens are not supported for accessing BitBucket repositories.
API tokens replace app passwords, which can no longer be created after September 9, 2025 and will be phased out June 9, 2026. While app passwords are still supported, they are not recommended. See Bitbucket Cloud transitions to API tokens for more information.
Create BitBucket credentials
- From an organization workspace: Select Credentials > Add Credentials. From your personal workspace: Go to the user menu and select Your credentials > Add credentials.
- Enter a Name for the new credentials.
- Select BitBucket as the Provider.
- Enter your Username (account email) and Token.
- Enter the Repository base URL (recommended). This option can be used to apply the credentials to a specific repository, e.g.,
https://bitbucket.org/seqeralabs.
AWS CodeCommit
To connect to a private AWS CodeCommit repository, see the AWS documentation to learn more about IAM permissions for CodeCommit. Then, use your IAM account access key and secret key to create a credential in Seqera with these steps:
Create AWS CodeCommit credentials
- From an organization workspace: Select Credentials > Add Credentials. From your personal workspace: Go to the user menu and select Your credentials > Add credentials.
- Enter a Name for the new credentials.
- Select CodeCommit as the Provider.
- Enter the Access key and Secret key of the AWS IAM account that will be used to access the target CodeCommit repository.
- Enter the Repository base URL for which the credentials should be applied (recommended). This option can be used to apply the credentials to a specific region, e.g.,
https://git-codecommit.eu-west-1.amazonaws.com.